Quick Changeover (SMED): 7 Steps to Improve Your Manufacturing Process
In this post, we’ll provide an overview of Quick Changeover, then detail the seven steps to improve your converting process. We’ll also show you three new machinery advancements in 2021 that can significantly improve your changeover.
We’ve included links to help you jump to each section of the post.
Defining SMED and Quick Changeover
How Does Quick Changeover Work in a Manufacturing Setting
7 Steps to Improve Your Converting Changeover Process
Converting Modules that Can Help
Defining SMED and Quick Changeover
Let’s start with the big picture, and define the two terms. They tend to be interchangeable, although most Western companies tend to use the term Quick Changeover. You may also just see these referred to as “changeover.”
What is SMED?
SMED stands for Single-Minute Exchange of Dies, and it is a lean production method used to reduce the waste in your manufacturing process. Like changeover, it helps reduce the amount of changeover time from running one product to the next.
What is Quick Changeover?
Quick Changeover is the amount of time taken to change a piece of equipment from producing the last good piece of a production lot to the first good piece of the next production lot. It’s essentially the same as SMED.
A Classic Quick Changeover Example
A perfect example of Quick Changeover is a pit crew at a race track. How quickly the company gets the car in and out of the pit can mean the difference between winning and losing.
Watch this video of a 1950 pit crew changeover vs one from 2013. The 1950 changeover takes 67 seconds. The 2013 changeover takes…well, just watch.

How Does Quick Changeover Work in a Manufacturing Setting?
It’s hard to say how many companies that use converting machines actually track their changeover rate. It is used among medical and pharmaceutical manufacturers, who have numerous validation requirements, as well as in the tag and label industry. Contract converters also track their changeover rate.
How Can You Determine Your Costs from Delays?
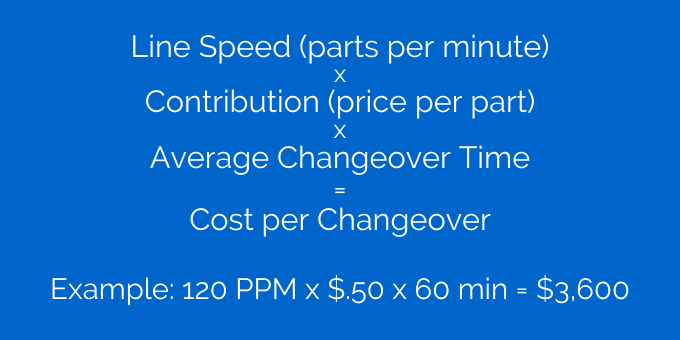
Let’s create a hypothetical converting example. We’ll assume your price per part is $.50, which includes material costs.
Now calculate the annual cost of a changeover.
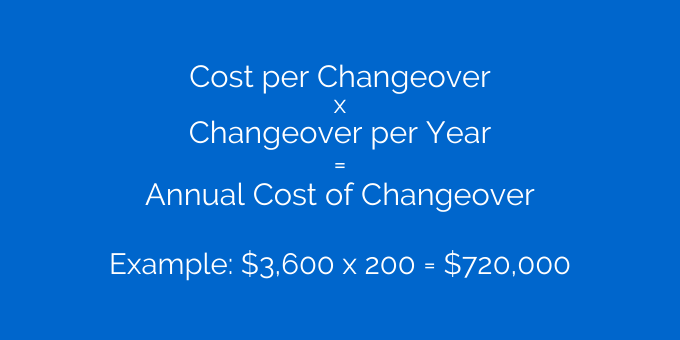
Obviously, there’s a lot of money to be gained (or lost) by improving your Quick Changeover efficiency.
Benefits to Improving Quick Changeover (SMED)
If you can attach a dollar value to the following improvements, they can help you justify and advance your efforts:
Reduce your defect rates and scrap while improving product quality
Because you’ll make less adjustments as part of your setup, you’ll improve quality on the first piece and reduce defects and scrap.
Reduce your inventory costs
As you reduce the number of batches and their sizes, you can recover operating cash and manufacturing space.
Increase your production flexibility
You’ll increase your output and boost the timeliness of your response to customer orders.
Increase your on-time delivery and reduce lead times
You’ll be more adept at meeting customer demands.
Reduce indirect costs
This includes costs for material movement, counting and transaction processing.
Reduce level of operator skills required
The more standardized your processes, the less you’re relying on operator skill and judgement calls.
How Do you Determine Your Quick Changeover Rate?
By conducting a Quick Changeover Analysis, which will include documenting your process and timing it, you can determine the rate we illustrated in the example above. We’ll get to the process – in general and specific to converting machines – in an upcoming section.
Goal: Quick Changeover Can Improve Production Flexibility
It should be noted that not everyone may be looking to reduce Quick Changeover time.
Tim McMahon notes that the “purpose for reducing changeover time is not for increasing production capacity, but to allow for more frequent changeovers in order to increase production flexibility. Quicker changeovers allow for smaller batch sizes.”

This is particularly applicable to contract converters, who are running many different jobs for a wide range of clients.
However, medical and pharma manufacturers may be very interested in reducing the time.
Quick Changeover Techniques: The 7 Steps to Improve Quick Changeover
Now that we’ve defined Quick Changeover and provided you with the means to calculate its financial impact, we’d like to take you through a 7-step process to improve your Quick Changeover.
The 7-step process is detailed by Ron Pereira of the Gemba Academy in this post, but we recommend you listen to this audio interview where Ron walks us through each step.

We’ll take Ron’s process and apply it to a typical converting run, so you can see an example of how to pursue Quick Changeover improvement.
Step 1 – Observe the Current Converting Process
There are a variety of methods you can use to document your converting machine process. Perhaps the most efficient is to video an actual press run. Make sure you’re in alignment with union policies and you have the ok from your own internal people.
You may choose to conduct one-on-one interviews with operators to determine the variations in how each operator approaches the job. You can also observe the process and take notes over the course of several shifts if an extensive video seems like overkill.
Step 2 – Categorize the Internal and External Converting Activities
An important part of SMED is distinguishing between the Internal and External activities. For a converting process, we’re providing a few examples:
Internal activities – Internal things can only be completed when the machine is not running. For example, changing a rotary die is an example of an internal activity.
External activities – These involved activities that can be performed while the machine is running. For example, this might include moving product materials to a storage area, staging the next product materials or gathering the tools and components for the next changeover.
Step 3 – Convert Internal Activities into External Activities
Are there things that you can do with Internal Activities that could become an External Activity? Are there things that you can do ahead of time? Are there any Internal Activities that you might be able to perform ahead of time?
Step 4 – Optimize the Internal Activities
Now that you’ve defined the activities, take a close look at how you’re performing them. Is there a way to generate some new improvements?
For example, you may find that members of one shift are setting the die or nip pressures at different levels. Perhaps you can mark the best setting on the machine (or on a chart) so all shifts adhere to it correctly.
If you don’t have die pressure readouts on your die clamps, understand that “tight” is a matter of personal preference or strength between operators. In this case, determine the number of turns on the knobs to achieve the proper pressure.
Step 5 – Optimize the External Activities
In the same respect, you can optimize external activities as well. Is there a way to store raw material rolls closer to the converting machine? For example, you could create lists of input materials – such as tools, rotary dies, components – and have them waiting on a cart nearby for the next job.
Step 6 – Document the New Procedure So It Can be Repeated and Reproduced
When you’ve defined the Quick Changeover process, now comes the time to thoroughly document it. Not only will this serve as the basis for future improvements, but it will also provide critical back-up in case computer systems crash or paper documentation is lost.
We’ve touched on the need for medical and pharma companies to validate their processes, so many readers may be doing this already. Part of the validation process includes keeping accurate records of the process. This includes:
Create a List of Materials
What materials are you using for a job? Not only should you list the particular materials, but you should also take into account where they are stored. Your list of materials should include:
- Specific raw materials used for the job, including empty cores for winding waste materials
- Location the materials are stored
- Specific tools required for changeover: rotary dies, nip rollers, bridge trucks, sensors, cables, hand tools, roll lift/crane, etc.
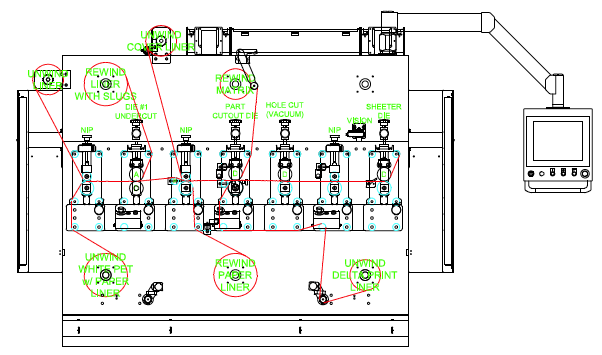
Document a Webpath for Each Job
Include input and output materials, sensor locations, clamp-on idler locations – everything along the webpath. It’s important to know where your rolls are going, where the materials wrap around the idlers, and where it meets up with the next station.
Many of our clients have a drawing – either one they draw out by hand or by using a CAD program – and it will be labeled so ops can take a look at it (we’ve included a CAD drawing in this post. You can also download our hand-drawn PDF as an example).
Document Any Manual Adjustments
When the job is underway, what type of manual adjustments need to be made? Do die/nip pressures need to be adjusted? At what level should you set a hydrojack? (We’ve included a list of specific components below that can be manually adjusted on Delta ModTech machines.)
Note that adjustments can vary based on a person’s strength or physical size, so it’s essential that you document the specifics. Always find a way to document the particular setting, unless it can be entered into the machine itself.
Here’s an example of a spreadsheet of these documented manual adjustments.
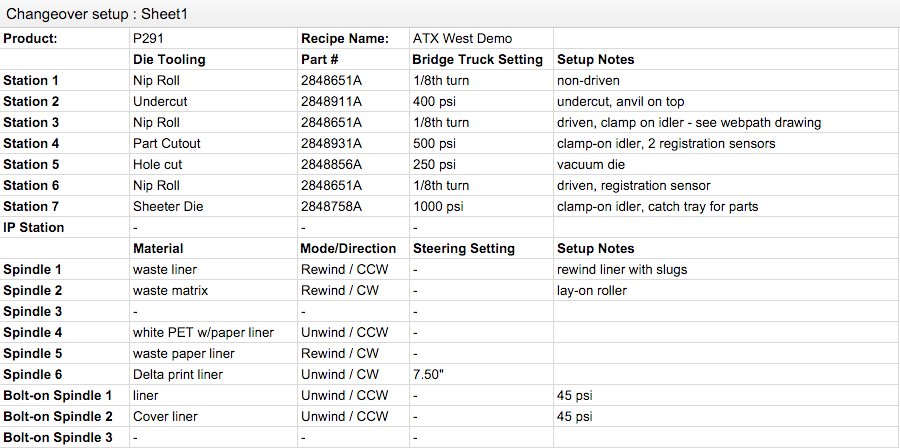
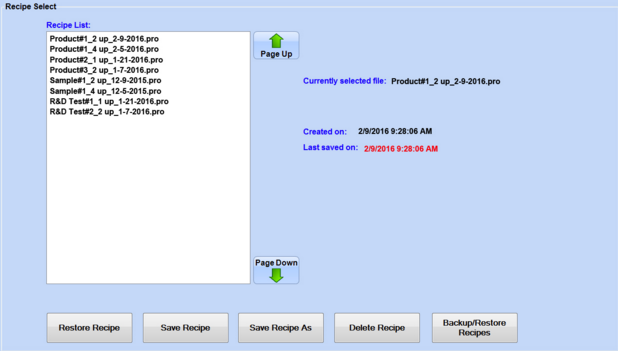
Save the Product Recipe on the Machine HMI (Human Machine Interface)
We call it the product recipe – these are the values that get entered in the machine computer for each job. Depending on the HMI you’re using, you should be able to save these values as a recipe.
Use Naming Conventions
Typical programs will assign the most current value to your recipes, but you should establish a naming convention for the values. For example: ProductName_partsize_dateofchange
Keep a List and Label Die Tooling Required
Maintain a list per job of what’s required. Tools can be turned in two different directions, so note which direction the die should be facing. Label the die tooling required for the job so it can be easily found by new operators.
Establish Back-up Recipes
Once you’ve developed your recipes and procedures, back them up on a secondary device or network. Most machines are connected to network servers, so you can back up recipes there. Backing up to an offsite server is also recommended.
- Back up recipes to a secondary device or network
- Scan webpath drawings or save them in your CAD program
- Back up manual adjustment list digitally (scan)
- Back up tooling list on a network drive
Create a schedule for these network backups. You’ll likely be making ongoing changes to the processes, and these will need to be recorded.
Step 7 – Pursue Perfection
This is only the beginning. As you’ve established your Quick Changeover Process, now you can begin to improve on it, bit by bit, shift by shift.
Dedicating yourself to the Quick Changeover Process requires an organizational commitment, but it may not be as resource intensive as some quality improvement processes.
As Ron mentions in the interview above, you can realize changes in as a little as 1-2 weeks by following the 7-step process. And for any organization, that’s quick!
Converting Modules that can Improve Changeover
Delta ModTech has developed specific modules that can speed your changeover. We’ve noted some new enhancements below:
T-Slot Idlers and Clamp-on Idlers

Idlers are used to change the web angle, and converters love using them because it provides more flexibility based on the project. Instead of clamping individual idlers, or moving and adding idlers, the T-slot idler and it’s slotted rack allows you to move idlers up and down or left and right in the slot, then quickly lock it in place.
How it helps: Quickly make precise adjustments to the web angle to help with lamination, de-lamination, tension and more.
NEW: Movable Spindles and Bolt-on Spindles

Everyone wants more spindles on their machines. However, sometimes they can interfere with other web paths within a process. Before movable spindles, you would have to mount more idlers. Now you can simply slide it out of the way.

Bolt-on Spindles can be added anywhere on the front plate of a Delta ModTech machine. You can add pneumatic spindles for simple waste matrix rewinding or add a bolt on servo spindle (BOSS) for unwinding and rewinding with precision tension control.
How it helps: Move spindles quickly to adjust web paths or add more winding capacity anywhere you need it.
Die Station Tracking Adjustment

Die Station tracking adjustment allows you to move each station cross-web (operator side – machine side).
How it helps: Make small web steering adjustments or move a die cut cross web by simply turning the knob. Each knob includes a digital readout for movement reference.
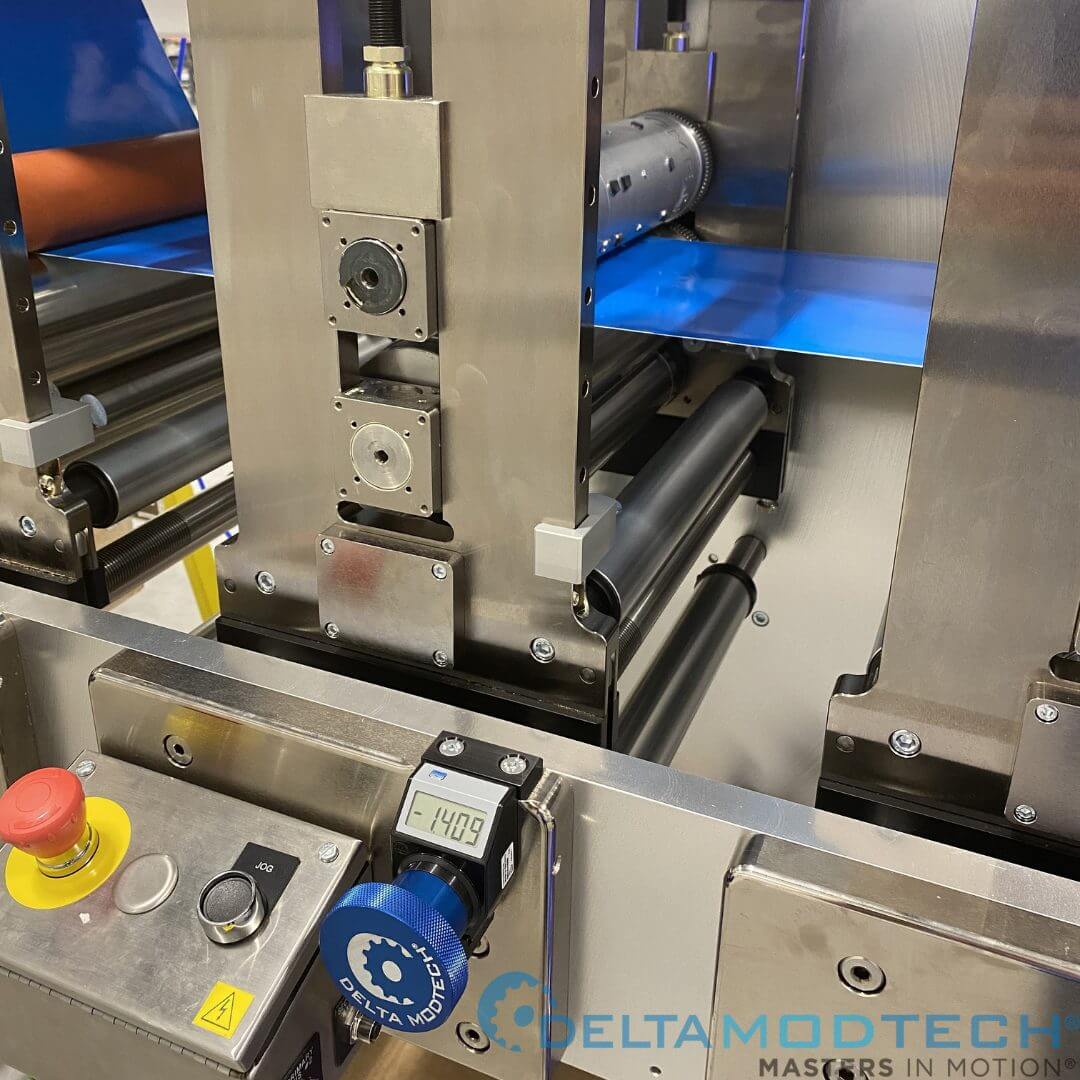
Hydrajack Bridge Clamps and Pneumatic Nips

Operators used to have to use two mechanical bridge clamps to put pressure on die and nip rollers. It was a manual process, and operators had to repeat the pressure set-up (by feel) with every changeover.
Hydrajack Bridge Clamps allow operators to apply uniform pressure across the die with minimal effort. They have a readout so the die pressure settings can be recorded with other process specifications. Hydrajack Bridge Clamps are primarily used on metal-to-metal die cuts due to the high amount of pressure they can apply.
How it helps: Simplify die pressure setup, allows for uniform and repeatable pressure across the roller.
Pneumatic Nips

A Pneumatic Nip can fully automate nip pressure adjustments for the operator. It also gives you the ability to save a recipe with the parameters, so the pressure can be called up with the rest of the process settings and adjusted by the push of a button.
Our Pneumatic Nip bridge trucks allow for tool-less installation and removal to further speed up your changeovers between stations.
How it helps: Instant nip setup, allows for uniform pressure across the roller. Easily movable between stations.
Download the Quick Changeover Guide
Get this blog post in a PDF format to share with your team.
Published on Oct 21 2021
Last Updated on Apr 01 2024
Categories: Changeover, Delta ModTech Blog
Tags: Lean Manufacturing, Quick Changeover, SMED
Next Post
Delta ModTech COVID-19 Update
Previous Post
COMPAMED 2021